Third-party single sign-on
Single sign-on client id
client ID
Single sign-on client secrets
secrets ID
matters needing attention
Remember to write and save the background parameters of OpenList. After writing and saving, you have to go back to the bottom of the personal data and there will be a button that needs to be bound, otherwise it cannot be used
Only one of the four types of single sign-on can be enabled temporarily. If you used other single sign-on methods before and then changed to a new single Unbind (just one click) and then bind the single sign-on method you want to use now.
If you use
GitHub,Microsoft,Google,DingTalk, you only need to fill in the client ID and secret key, and select the corresponding platform in the options.- If you use
Casdoorthe following parameters need to be filled in, just follow the tutorial to fill in
- If you use
Registration binding single sign-on
SSO automatically registers as an OpenList account
- OpenList Version > v3.22.1 New Features
Before using single sign-on to register as an OpenList account, we need to bind the single sign-on of OpenList first, the binding method is explained above
Supports the
fivesingle sign-on methods mentioned aboveDo not use the default organization (app-built-in) directly, because all users in this organization are global administrator accounts
Except
CASDOOR, you only need to fill in theClient idand theClient secretsand the newly added single login account registered as Alist account configuration
SSO Full Fill Demo
Please refer to the detailed description below for how to fill in, the schematic diagram is just a reference for filling in and not suitable for everyone’s user habits
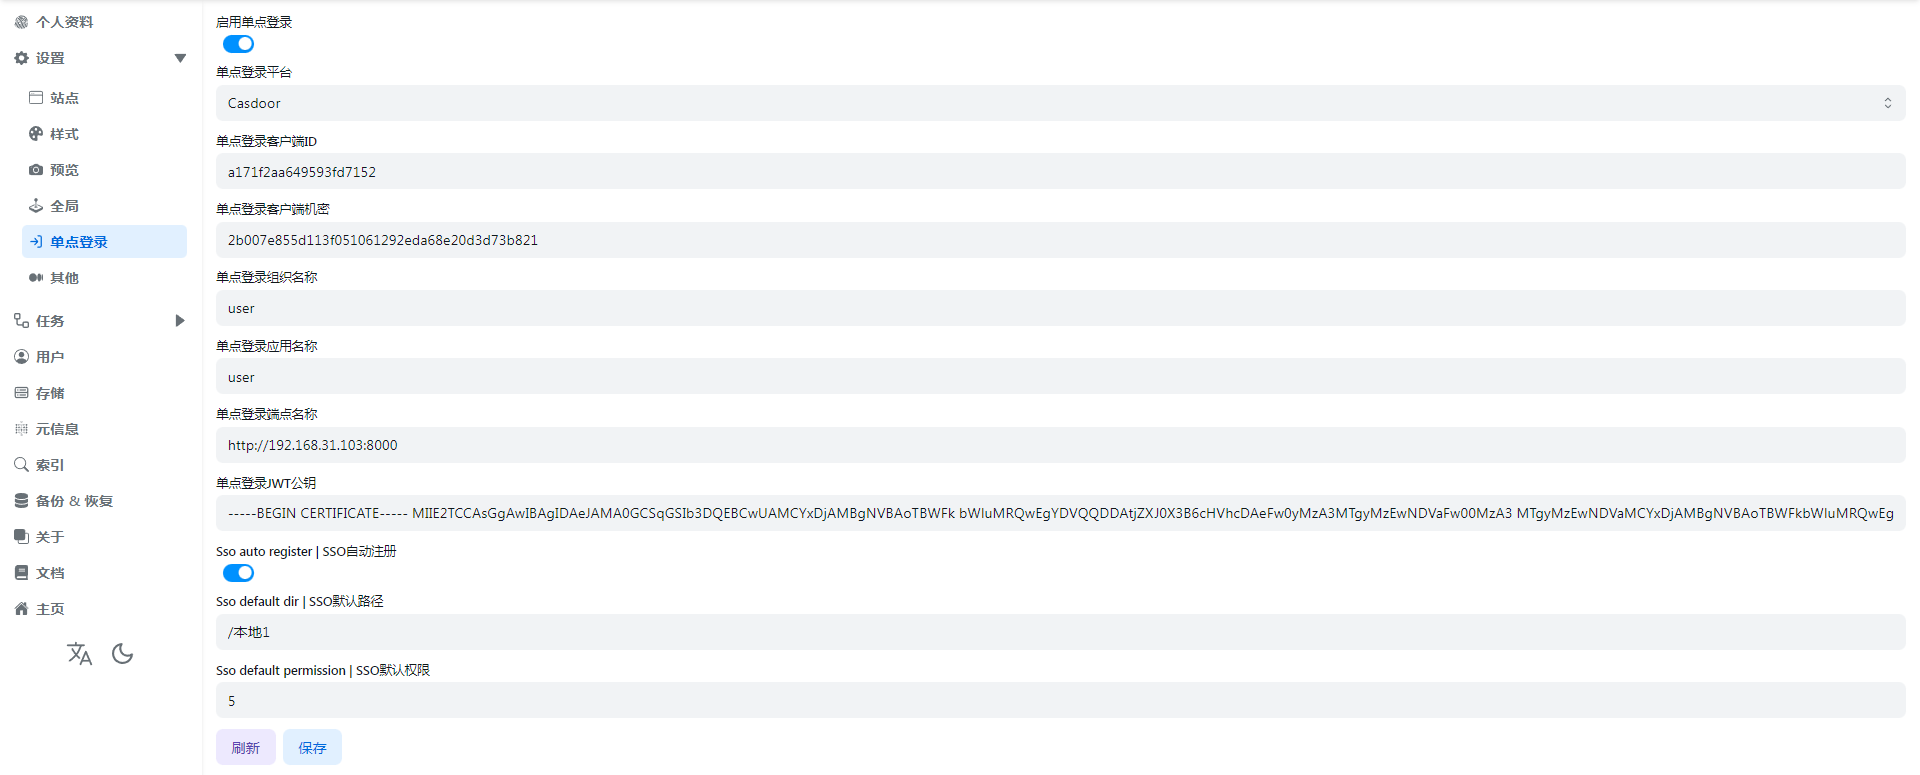
SSO auto register
If we want SSO single sign-on to be registered as an OpenList account, we need to enable this option before it can be used
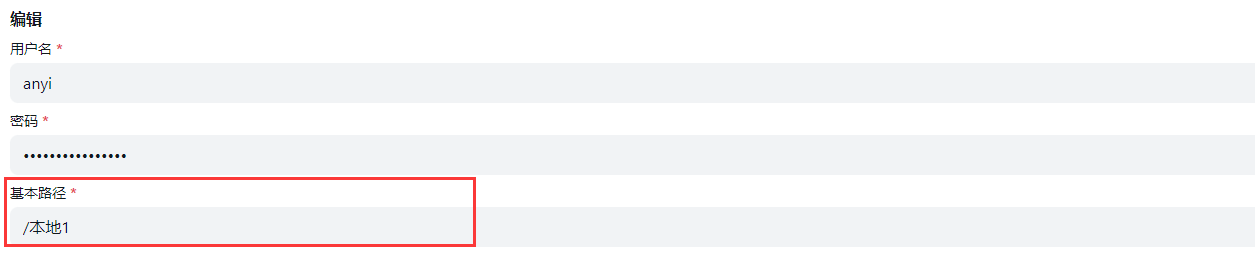
SSO default dir
That is to say, the default path used by the registered account is equivalent to the Base path in the OpenList user settings.
It can be the root directory /, or the path /path/test/Demo specified by the user
SSO default permission
It is equivalent to which permissions are enabled by default for registered users, as shown below


The default is 0, no permission is enabled
If we need to enable some permissions during registration, we only need the sum of the numbers of different permissions
For example:
- We need to open the user's
WebDav readingandWebDav manageby default, that is 256+512=768, we just fill in768in the options - If we need to open the three permissions of
Make dir or upload,RenameandDeleteby default when registering, then it is 8+16+128=152, we can fill in152in the background
I won’t say much about the examples, just add the permissions you need
Precautions and instructions
4.1-There is already this user in the OpenList user database
| username | password | base_path | role | permission | opt_secret | github_id | disabled | sso_id |
|---|---|---|---|---|---|---|---|---|
| anyi | FzdDfkmU | /test1 | 0 | 3 | 0 | |||
| anyi_dc188911 | RUCtgqCw | /test1 | 0 | 3 | 0 | dc18891 |
As shown in the above table, a string of redundant ids is added after the newly registered single sign-on user name
This is because the same user already exists in the OpenList user database, so the sso_id is also added after the user name
If your newly registered single sign-on user name does not exist in the OpenList user database, it will not add the sso_id after the name
4.2-What should I do if I don’t want the SSO account to be registered as an OpenList account?
Just turn SSO auto register off,This will not affect the use of accounts that have been registered using Sso
4.3-If I turn off the single sign-on option, what should I do with the account registered with Sso?
Don't worry, after using single sign-on to register and log in to OpenList, log in in the background, and find personal information after logging in
- You can modify
usernameandpasswordby yourself, save it after modification, so that you can log in with the OpenList account normally - At this time, you can click
Unbind Single Sign-On Platform, you can unbind or not unbind, and the subsequent default path and default permissions of this user can only be modified by the administrator in the OpenList background user
4.4-Why is this error code displayed when using sso?
{
    "code": 400,
    "message": "The single sign on platform is not bound to any users: record not found",
    "data": null
}
This is because Single Sign-On Automatic Registration is not enabled for the OpenList account, and the single sign-on cannot be registered as an OpenList account
- If you are an administrator, you can turn it on
- If you are a user, you can contact the administrator to enable
Sso compatibility mode
OpenList single -point login is bound to Dingtalk, and then opens Alist in the Dingtalk application, When you log in, choose Dingtalk login and jump to your computer browser. After authorization, you find that there is no response, because the browser cannot jump to the Dingtalk application inner browser page
At this time, you need to open the sso compatability mode again to click on the login to log in successfully
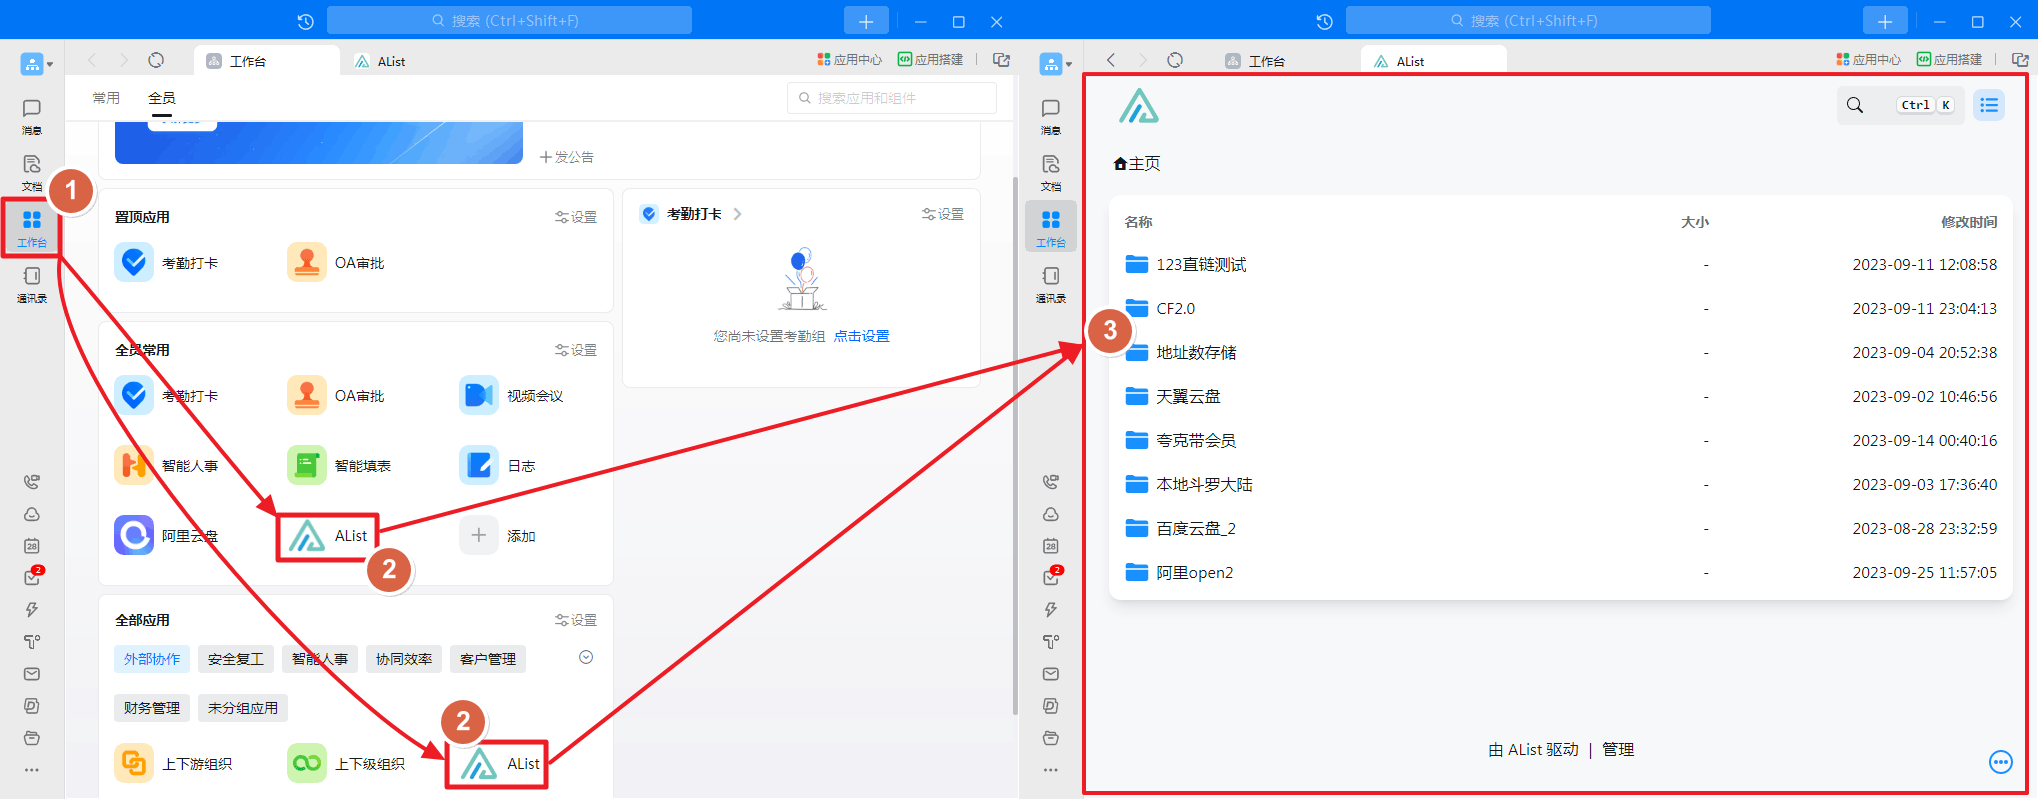
OpenList applied in Dingtalk and opened as shown in the figure:
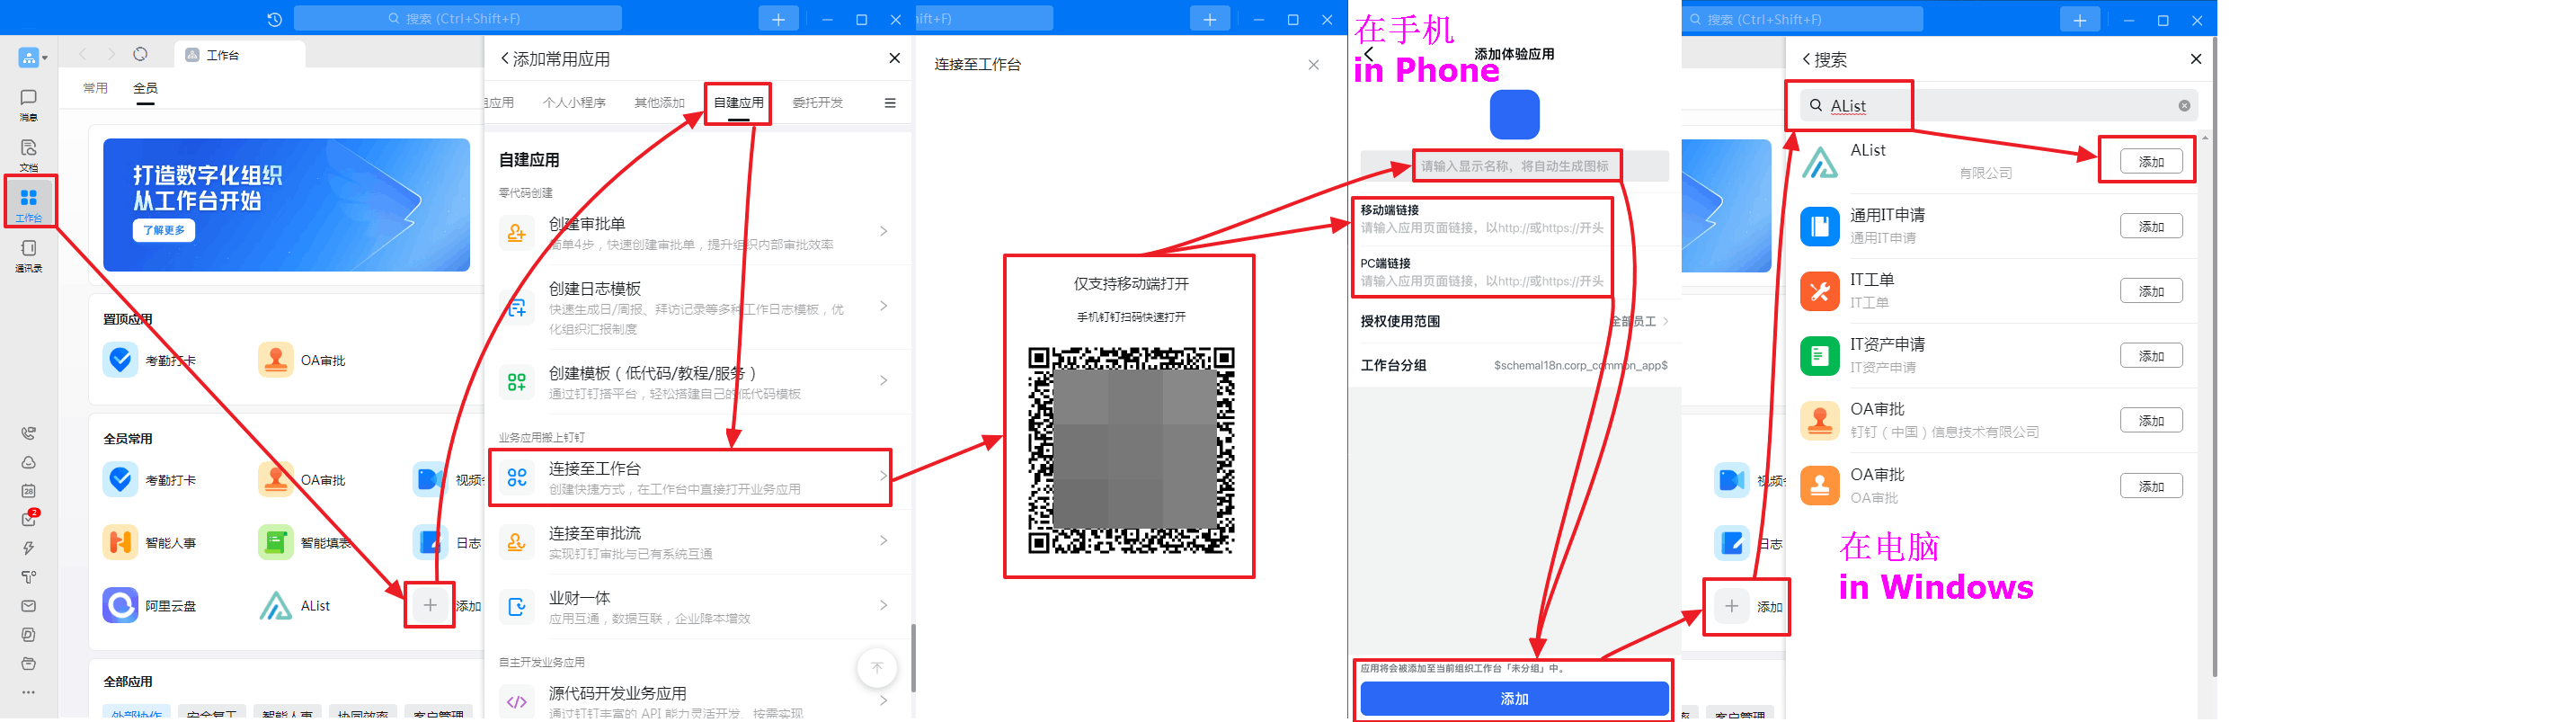
How to create the application in Dingtalk workbench
A picture teaches you to create a new application and add it
- LOGO is not modified when the newly -built newly built, you can wait for the newly built and then modify (See_Figure_2)
- If you just browse OpenList in the Dingtalk application, you do n’t need a single -point login management, you do n’t need to set up a single -point login configuration, you can just add an application
Modify the application logo
Open DingTalk open platform management Find your newly built app to modify the logo.
![]()
redirect url
After turning on Sso compatibility mode Then you need to log in to the corresponding software to modify the redirect url to change it to the two redirect url below
GitHubonly needs to add one:http(s)://You_Url/api/auth/sso_get_tokenMicrosoftandGoogleboth need to be added, you can add multiple Redirect urls, so you only need to add two Redirect URLs.
http(s)://You_Url/api/auth/get_sso_id
http(s)://You_Url/api/auth/sso_get_token
If you enable the Sso compatibility mode if you do not modify it, you will prompt Invalid Redirect URL Error